Backpack progress

Weekend Challenge: The Backpack (part II)

Image

The front of the bag with 2 zippered pockets.

When we left off last week, I was about halfway done with my new backpack. The back and sides of the exterior of the bag were mostly finished.

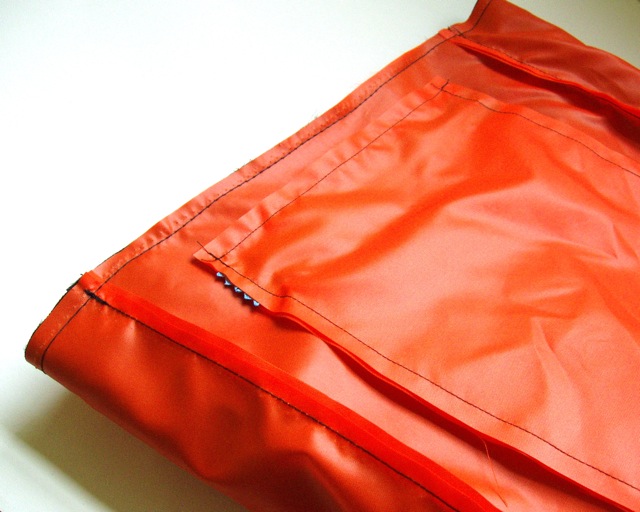
Next step was to make the front exterior panel. I wanted a couple of zippered pockets on the front – one large one for easy access to a notebook and one smaller one for snacks, pens, and my iPod.

The top pocket goes all the way to the bottom of the bag and is lined with red Cordura® nylon. The bottom pocket with the gray zipper has a gray lining (go figure).

I attached the front of the bag and added the flap and a small handle onto the back to complete the exterior of the bag.

Lining is now attached to exterior

Lining sewn to exterior

Time to make the lining! I used international orange (aerospace) 200D nylon. It’s bright, but not too bright.

I put another zippered pocket in the lining. Because it’s hard to have too many pockets, really.

Once the lining was attached to the exterior, the moment of truth had arrived.

Patience!

Patience!

It requires a bit of patience and maneuvering to turn a padded backpack inside out through a hole in the lining. I finally got it turned and everything was in the right place – the flap, straps, and handle were on the outside where they were supposed to be (it kind of sucks to turn a bag and realize that you’ve sewn the flap inside the lining of your bag. Not that I would know from personal experience or anything…).

I sewed up the hole in the bottom of the lining and the bag was done.

All packed up and ready to go to class

All packed up and ready to go to class

On to field testing!

So far, my new backpack has been on trips to the library, a wallet delivery run, and, of course, to class. It’s performed well so far and has gotten a bunch of compliments.

There are a few minor things I am planning to change for round 2, like making the bottom outside pocket deeper and making the bag flap shorter.  I may also play around with a roll-top bag so there’s no gap on the top sides. Overall, though, I’m pretty pleased with this as a prototype.

Time for a new backpack

Weekend Challenge: The Backpack (part I)

Late Friday evening I decided to make myself a backpack to carry my martial arts gear to and from class. I’ve got a heavyweight uniform, plus a water bottle, snacks, glasses, iPod, some pens, and a small notebook.

I thought I’d try to make the bag on Saturday before my next Ju Jitsu class. That meant I’d have about 4 hours to plan the bag, cut the fabric, and actually sew it all together. To make things even more interesting, I’ve never made a backpack before. I’m making it all up as I go along – no patterns or tutorials, though I am using my current backpack as a reference for some technical details.

Spoiler alert – I did not finish the backpack before class. I did, however, make a huge amount of progress on a prototype and I like it quite a bit so far.

I’m using 1000D Cordura® nylon for the outside of the bag. I’ve got a shipment of some lighter weight nylon that’s supposed to arrive on Monday and should be perfect for the lining.

After making some notes about size and features, I cut out the pieces for the exterior body, flap, and straps.

Padded straps with fancy red stripes.

Padded straps with fancy red stripes.

Then I started in on the straps. I wanted padded straps so I used 3 layers of 1/8″ closed cell foam that I stitched together about an inch from either end to avoid shifting. I had some trouble actually getting the foam inside the straps. I ended up attaching a binder clip and some string to the foam, feeding the string through the empty strap tubes, and pulling the foam through.

It's starting to look like a backpack!

It’s starting to look like a backpack!

After I got the straps all sorted out, I moved on to the back. I decided to make padded back panels so I cut some more foam and nylon. I made a couple of pockets for the padding with a vertical 2 inch gap between them that should run along my spinal cord if all goes according to plan. I attached the tops of the straps to the top of the back panel and sewed some small triangular panels near the bottom of each side of the back panel to connect to the bottoms of the straps.

By the time I attached the exterior gussets to the back it was time for class.

To be continued…

The Personal Touch

Custom Orders

We’ve been mentioning custom orders a bit on the blog lately, so we thought we’d show you some of the custom work we’ve done over the past couple of years.

The pieces include custom color combinations of our standard wallets as well as one-off designs with special features.

Adam R. liked our classic card holder, but wanted a version in black, brown, and blue. We were pleasantly surprised with how well it turned out…

Image

Our classic credit card wallet in custom colors.

Adam Z. wanted a long wallet. with a bunch of credit card slots, an ID window, and multiple pockets for checks/cash/receipts.

Image

Custom long wallet.

Donald likes large smartphones.  He wanted a phone case that he could wear on his belt. We came up with this one – the flap wraps around the phone. To get the phone out, you just pull on the flap. Donald’s been back a few times for more cases, most recently when he upgraded to a larger phone.

This design eventually spawned our C-series device cases (no, they don’t have belt loops…).

Image

Custom smart phone case (with belt loop!)

Lauren really liked our Messenger Bags, but wanted an extra feature – a tab and o-ring attached to the inside of the bag.  She was getting ready for a trip abroad and wanted to clip one of our seatbelt wallets to her bag for a little extra security.

Image

Custom Messenger Bag with added tab and o-ring for attaching a wallet.

Nick wanted one of our seatbelt wallets with a matching zipper pouch made out of seatbelt webbing. He also wanted a keyring inside the pouch.  I keep meaning to make more seatbelt zipper pouches…

Image

Zipper pouch with attached keyring.

Ben wanted a very colorful wallet. The outside is gold and orange. The inside is red, gray, and silver. It looks really sharp!

Image

Colorful!

Matt wanted one of our Billfold Wallets with a Zipper Coin Pocket. But wait, there’s a twist. He wanted 2 additional card slots on the outside of the wallet. Voila!

Image

Our Coin Pocket billfold with 2 exterior card slots.

Sergio wanted a wallet with an ID window, side load pockets, a grommet hole for a chain, and an elastic band closure.
Image

Custom billfold with side load pockets, grommet hole, and elastic band closure.

Image

Interior view.

And there you have it – a small sample of some of our custom work.

Contact us at retoolsf@gmail.com if you have a custom project you’ld like us to take on!

Thank you Maker Faire!

retool booth at Maker Faire 2013

Here’s a photo of our booth on Saturday.

Maker Faire 2013 recap

Well, Maker Faire Bay Area 2013 is over and we have just about recovered from the long days and hot sun. We had a great time. A few folks stopped by to show us the wallets they bought from us last year (we’re almost getting used to people taking out their .retool. wallets and waving them at us in public places).

One of the fun things about doing a big show is interacting with people and helping them find the wallet style best suited for their needs.  We love helping folks replace blown out wallets – we take our mission as a wallet rescue squad rather seriously.

This year we saw binder clips, rubber bands, and a hair elastic used as ‘money containment systems’. Our favorite by far, though, was this one made out of an old PBR carton:

Homemade wallet from PBR carton - front

Here’s the front…

Image of homemade PBR wallet

…and here’s the back of the wallet.

It’s a basic sleeve style credit card holder covered in a layer of protective packing tape.

The only problem is that it was almost impossible for its owner to get the cards out. We were lucky enough to witness the process, which involved a considerable amount of shaking, tapping, and pounding.

And now the guy who made the PBR wallet is sporting one of our new Micro Mini Credit Card wallets with a flap that wraps around the cards. To get the cards out, you just pull on the flap – no shaking or pounding required.

The only thing that would make Maker Faire more fun is if we could actually get a chance to explore during the weekend.  Fortunately for us many of the cool vehicles were slowly roaming around the grounds and eventually made their way around to us. Here are a few photos of what we (mostly) missed.

This slideshow requires JavaScript.

Getting ready for a show

It’s (almost) show time!

Vending at a large event can be a lot of fun. Plus, it’s a great opportunity to watch people interact with what you make and to collect valuable feedback from customers.

Not surprisingly, getting ready for a big show takes a lot of work.  Making sure you have (more than) enough inventory is just a small part of it.  You also need to figure out how to attractively display your wares, get everything to and from the event, and bring along everything else you’ll need (receipt book, price cards, tape, pens, sunscreen, chairs, and snacks to name just a few).

We’ve been doing shows for a few years now and we get a little better each time.  Here’s a look at some of the preparations for our next show. We’ll be part of the Bazaar Bizarre Craft Marketplace at  Maker Faire Bay Area 2013 on May 18 & 19.

We made new money aprons with a zipper pocket for large bills, 2 main cash pockets, and a pen slot.

We’re bringing a full complement of keychains, including ones made of rubber and car upholstery vinyl.

New product display boxes – the outside is seatbelt webbing (of course!) and the inside is billboard tarp.

Webbing samples for our Design A Wallet experiment

Webbing samples for our Design A Wallet experiment.

Made new hangtags for our seatbelt messenger bags

New hangtags for our seatbelt messenger bags.

Small batch of nylon wallets made just for the show

Small batch of nylon wallets made just for the show

A new sign.  Still needs to be ironed!

A new sign. Still needs to be ironed!

Billfold wallets - standard, ID, chain, and zipper pocket.

Billfold wallets – standard, ID, chain, and zipper pocket.

New display stand for wallet chains and keychains.

Updated price cards

Updated price cards.

Small chair for the booth (it's not quite as small as it looks in the photo)...

Small chair for the booth (it’s not quite as small as it looks in the photo)…

Custom Orders: An Experiment

Design A Wallet

At Maker Faire, we'll give customers the opportunity to design their own wallet.

At Maker Faire, we’ll give customers the opportunity to design their own wallet.

Whenever we do a show there are at least a few people who ask us for something we don’t currently make. From time to time these interactions lead to a custom order.

At their best, custom orders are pretty cool. They can provide an opportunity to experiment with new design elements, materials, or ‘interesting’ color combinations. We’ve been lucky to have some pretty awesome customers who are great to work with.  We’ll highlight some of our favorite custom orders in a future blog post.

Custom orders can also be challenging. They are almost always more time-consuming than a standard order. There may be some product testing involved with a new design or you may need to source and acquire new materials. You also need to confirm with the customer that you’ve correctly interpreted their request.  This can involve several rounds of communication.

On rare occasions, you may even need to politely turn down a custom request.  We’ve learned that if the project isn’t a good fit – for whatever reason – it’s in everyone’s best interest to bow out gracefully.

So, with a slight bit of trepidation, we are planning an experiment for our booth with Bazaar Bizarre at Maker Faire on May 18-19: We’ll be offering folks the opportunity to design their own wallet based on our standard seatbelt wallet.

Interior of our standard billfold wallet

Interior of our standard billfold wallet

Customers will choose the webbing and interior pocket colors. They will also have the option to add a coin pocket, ID window, and/or chain attachment.  We’ll be setting aside a special section of the booth with webbing and pocket samples for people to experiment with.

Here is a small selection of available webbing options.

Here is a small selection of available webbing options.

Here are some of the color options for the wallet interior.

Here are some of the color options for the wallet interior.

We’re hoping that limiting the ‘Design A Wallet’ options will simplify the customization process. We’re really curious about whether offering a custom version of our wallet will make people more (or less) likely to ask for other types of customization.  We are still planning to take custom requests for other products.  And if the display causes unnecessary confusion, we’re completely prepared to dismantle it on the spot.  Gracefully, of course.

Lunch at Cha-Ya

Agadashi tofu in the foreground; Sea vegetable salad in the background. Both were delicious!

Agadashi tofu in the foreground; Sea vegetable salad in the background. Both were delicious!

Cha-Ya

One of the things we love about living in San Francisco is the vast array of tasty vegan food options. Even restaurants that aren’t specifically vegetarian generally have a few interesting looking items or are happy to modify their non-vegan offerings.

That said, it’s  still nice to go to a restaurant and know that you can order absolutely anything on the entire menu.

One of our go-to vegan restaurants in San Francisco is Cha-Ya.  We stopped by for lunch recently after our weekly .retool. business meeting.

Here’s what we ordered:

Agedashi Tofu – deep-fried tofu in a special sauce, garnished with kaiware, green onion, grated daikon, ginger, and nori.

Sea Vegetable Salad – a variety of marine vegetables including seasoned hijiki served with a creamy sesame dressing.

Cha-Ya Delight – brown rice bowl. seasoned organic brown rice topped with carrots, kabocha, broccoli, cauliflower, shiitake, lotus root, zucchini, snap peas, snow peas, atsuage tofu, hijiki, pickled burdock and daikon, broccolini, and kaiware.

Their menu is huge, so we like to get one or two dishes we know and love and then experiment with a new option.  The new option this time around was the Agedashi Tofu. It quickly became one of our favorites – the special sauce is quite tasty and the mix of seaweed, onion, ginger, and daikon was just about perfect.  We’ll definitely be ordering this one again.

The Cha-Ya Delight was awesome, too. The vegetables were super-fresh as always and the seasoned brown rice was nice and savory without overpowering the vegetables. There are two of most vegetables in the bowl, so if you’re sharing and you want some of everything, you have to be a little careful when dividing the servings.

The Sea Vegetable Salad was refreshing and complemented the other dishes quite nicely.

We’ll be back soon!

Countdown to Maker Faire Bay Area 2013

Maker Faire Bay Area 2013

May 18 &19
San Mateo County Events Center, CA

Maker Faire Bay Area is less than 4 weeks away!

For the second year in a row, .retool. will have a booth at the event with Bazaar Bizarre San Francisco.

We had a great time last year. Two of our favorite things were the giant Daleks and the awesome cupcakes from Cynically Delicious.

Maker Faire - where giant daleks mingle peacefully with humans.

Maker Faire – where giant Daleks mingle peacefully with humans.

We have spent the last month or so fine-tuning some new designs and we’re  making some changes to our displays, so we’re going to be extra busy for a while.

We’re planning to highlight Maker Faire-related topics on the blog for the next few weeks. We’ll share sneak peeks of our newest designs and display ideas and also feature some other folks who will be selling handmade goods along with us as part of the Bazaar Bizarre SF contingent.

This week we’ll take a look at some of our latest designs that will be premiering at Maker Faire.

Gadget Cases

We have 4 (!) new gadget cases.

Our C series comes in a variety of sizes to fit devices ranging from an iPad mini (or similarly sized item) to a 13″ MacBook. They are made of seatbelt webbing and are lined with eco-fi felt.

C-4 gadget case.

The C-4 is perfect for carrying around your iPad mini or similarly sized device.

The C-5 is sized for an iPad. Pull on the flap to lift your device out of the case.

The C-5 is sized for an iPad. Pull on the flap to lift your device out of the case.

The C-6 fits a 13" MacBook.

The C-6 fits a 13″ MacBook.

Our front zip pouches feature fun prints paired with durable Cordura® nylon.

Our front zip pouches feature fun prints paired with durable Cordura® nylon.

Tiny Wallets

We have two new minimalist Credit Card Wallets that we wrote more about here.

The Micro Mini with Flap is basically a scaled down version of our C-series device case.

The Micro Mini with Flap is basically a scaled down version of our C-series device case.

The Double Sided Micro Mini has a card slot on the front and back.

Long Wallets

Rounding out the new products, we have two larger wallets that evolved from our passport wallets.

Our long wallet features a slot for bills or a checkbook on one side and card slots on the other.

Our long wallet features a slot for bills or a checkbook on one side and card slots on the other.

Our checkbook wallet is a simplified version of the long wallet, designed to hold a standard checkbook and transaction register.

Our checkbook wallet is a simplified version of the long wallet, designed to hold a standard checkbook and transaction register.

Are you as excited about Maker Faire as we are? Get your tickets here.

Making a Keychain – play by play in pictures

A project in pictures:
Small chainmaille keychain in Half-Persian 4-1

Earlier this week, it was sunny and warm outside - perfect for weaving chain out on the back deck.

Earlier this week, it was sunny and warm outside – perfect for weaving chain out on the back deck.

View from the back deck. You can see Corona Heights Park off in the distance.

View from the back deck. You can see Corona Heights Park off in the distance.

The raw materials - 29 jump rings, a split o-ring, and a trigger snap.

The raw materials – 29 jump rings, a split o-ring, and a trigger snap.

Preparing the rings - half are now closed and half are open.

Preparing the rings – half are now closed and half are open.

The chain is done. Just have to attach the trigger snap and o-ring.

The chain is done. Just have to attach the trigger snap and o-ring.

The finished product!

The finished product!

Tiny Wallets, or Hooray for Minimalism – the Evolution of the .retool. Credit Card Wallets.

Minimalist Wallets

Here at .retool. headquarters, we occasionally talk about how ironic it is that we are working toward making a living selling things when we neither of us really likes to participate in consumer culture.  We don’t like acquiring stuff just for the sake of having it.

We do, however, both greatly enjoy objects that are well-designed and well-made. We like simple things that work and that are pleasing to the eye (and hand). We keep these concerns in mind when we design our products.

We also happen to have soft spot for small things.  So we have always liked having a line of credit card wallets in addition to our billfold wallets.  Credit card wallets are great if you don’t (or don’t want to) carry a ton of stuff around.

We started with a couple of basic designs.

Round 1: The Classic and the Slim Mini

Classic

The Classic Card Holder – this wallet holds a surprising amount of cards (15+) and can still fit in your front pocket.

The Slim Mini Card Holder - thinner than the Classic with a slightly smaller capacity.

The Slim Mini Card Holder – thinner than the Classic with a slightly smaller capacity.

Then we came up with two other variations.

Round 2: The Classic Mini and the Slim Mini Deluxe

The Classic Mini has a smaller footprint than the Classic. Plus, it has an elastic band closure.

The Classic Mini has a smaller footprint than the Classic. Plus, it has an elastic band closure.

The Slim Mini Deluxe Card Holder. We got a number of requests for a card holder with a coin pocket. We were happy to oblige.

The Slim Mini Deluxe Card Holder. We got a number of requests for a card holder with a coin pocket. We were happy to oblige.

After those two additions to the fleet, we thought we were done with credit card wallets. Recently, however, we got a request to  make an even smaller version.  So we came up with a few ideas and started prototyping.

We had two clear winners .

Round 3: the Double-Sided Micro Mini and the Micro Mini with Flap

Double-Sided Micro Mini

The Double-Sided Micro Mini is approximately 3 3/4″ by 2 7/8″ and less than 1/4″ thick. It has one pocket on the front and one on the back and holds about 8 cards.

The Micro Mini with Flap is approximately 3 3/4" X 2 7/8" X 1/4". It has a pocket with flap that wraps around your cards. Pull on the flap to lift out your cards.

The Micro Mini with Flap is approximately 3 3/4″ X 2 7/8″ X 1/4″. It has a pocket with flap that wraps around your cards. Pull on the flap to lift out your cards.

So now we make 6 different credit card wallet models – a little something for everyone.

.retool. wallets are handcrafted in San Francisco. For you.